Git and GitHub
Introduction to using Git and GitHub. Created by @nguyenbrian, @JevinSidhu, @uditdesai, and @vaibhavyadaram.
Basic Git and GitHub
This workshop has been retired and is no longer maintained or recommended.
Table of Contents
Tips and Tricks While Using This Workshop
- To see a GIF in another tab, right click on the GIF and click open in new tab.
- Don’t include the square brackets mentioned (
[text-here]) when typing. - Those are indicators of areas where you type custom text.
5. Type: git branch [branch-name]would be:git branch custom-text.- After you type a command in the terminal, hit “enter” on your keyboard to complete the command.
Preparing Your Workspace
Note: If you already have a pre-existing workspace you can skip to the next section.
Git requires at least one file in your workspace to be used. The steps below will take you through setting the workspace up.
-
Login to your Cloud9 homepage - https://c9.io/
-
Register if you haven’t already.
- We recommend signing up with your GitHub account - https://github.com/.
-
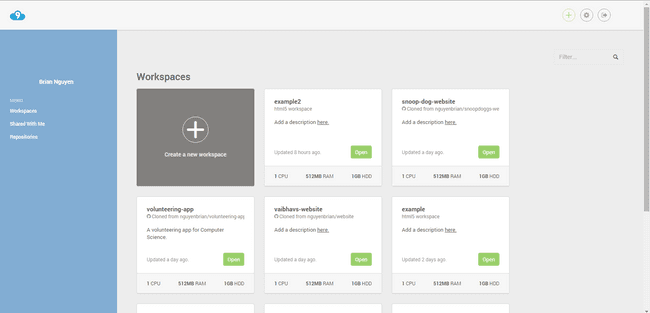
It should look like this:
-
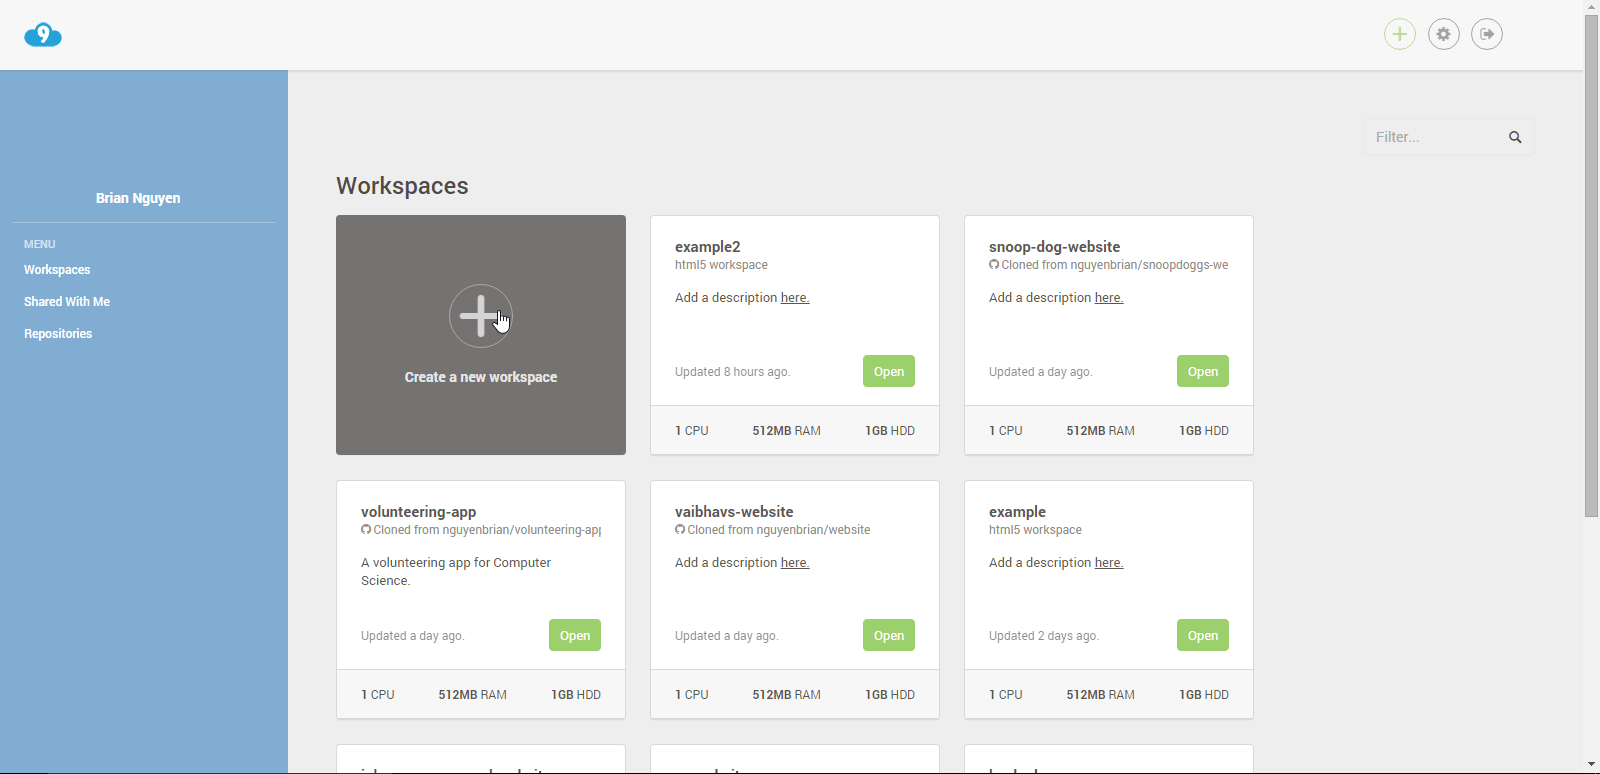
Create a workspace!
-
Press the create a new workspace button.
-
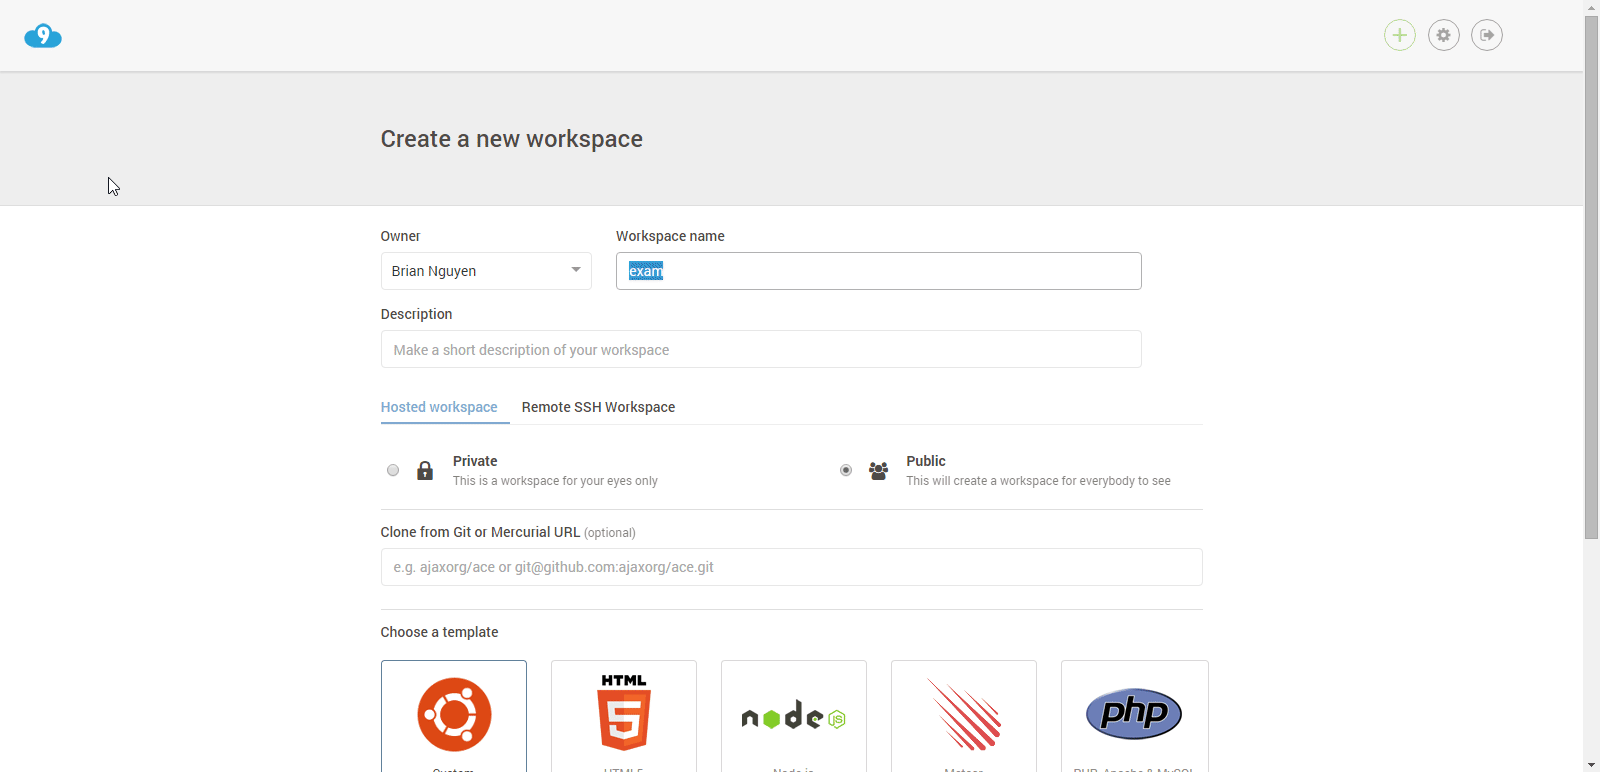
Give the workspace a good name that conveys what the workspace is used for quickly, and concisely.
- There are no spaces allowed in the name, use a dash (
-) for spaces if you need them.
- There are no spaces allowed in the name, use a dash (
-
Add a short description, you’ll thank yourself later!
-
Select public for the privacy settings, it’ll make it easier for people to help you with your project.
-
If you already have a GitHub project with files and you want to have it ready when you create the workspace you can add its link in the box provided.
-
For the template you may choose either Custom or HTML5.
-
Get rid of the unnecessary junk.
-
On the left sidebar: Right click on
README.mdandhello-world.html.-
Select “Delete” and Yes to any warnings.
- You won’t need these for your project.
-
-
Close the opened
README.mdas well.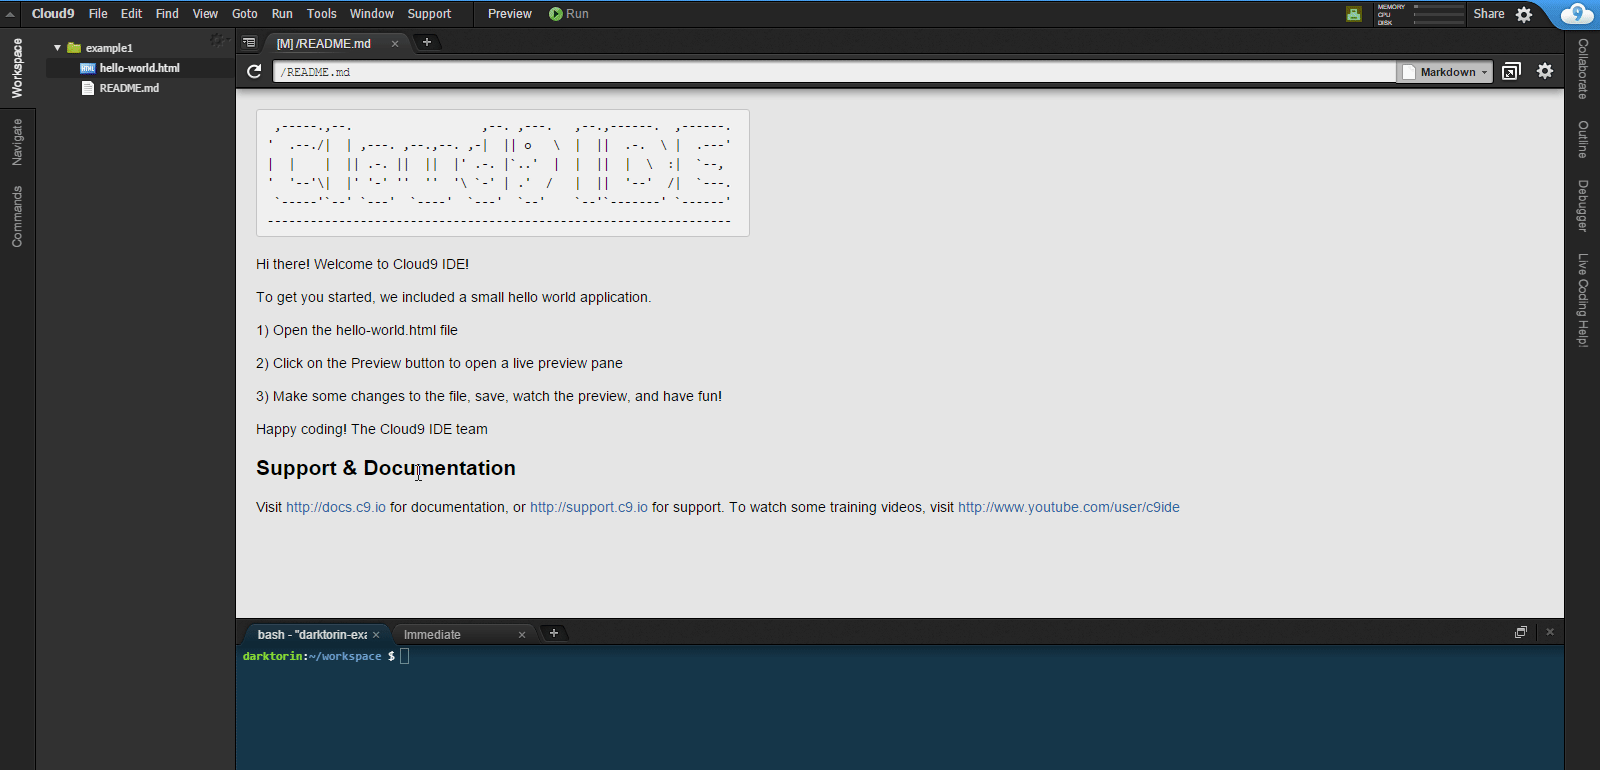
-
Create an
index.htmlfile. -
On the left sidebar: Right click and press “New File”.
-
Name the file
index.html. -
Double-click and open it.
-
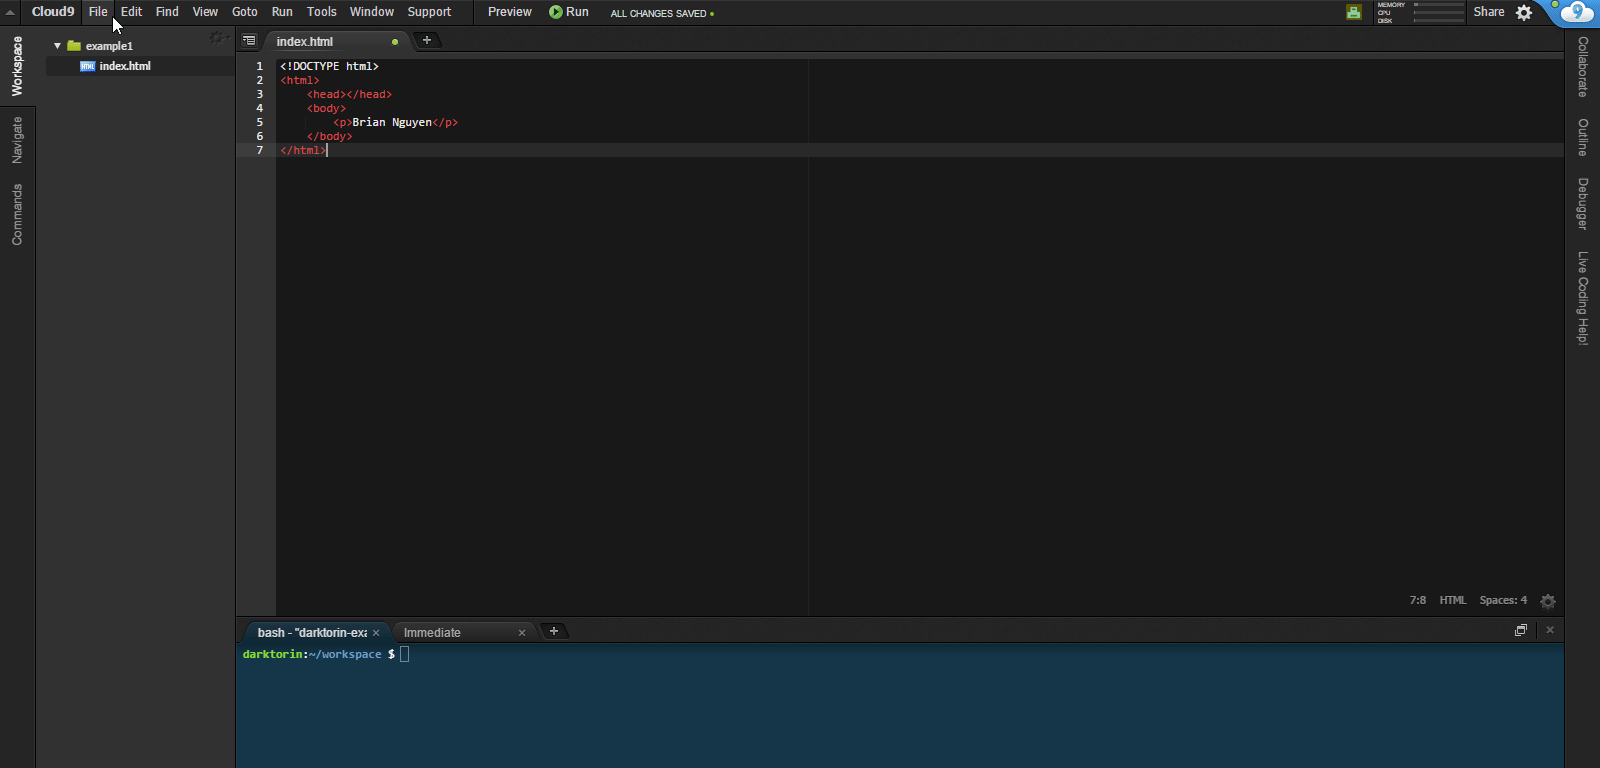
Write your name in the
index.htmlfile. -
If you don’t know how, you may use this pre-provided code:

<!DOCTYPE html>
<html>
    <head></head>
    <body>
        <p>Your name here</p>
    </body>
</html>
-
Save the
index.htmlfile. -
Make sure the active file is the
index.htmlfile by either clicking on it on the sidebar or clicking anywhere in the code. -
You may press Ctrl+S (Windows), Command+S (Mac) or go to File —> Save.
-
Celebrate!
Your workspace is now ready to be used with Git!
What is Git?
Git is a version control system - https://git-scm.com/
-
Tracks and manages changes to your code.
-
Git has tools to show that it has detected a change in the file.
- Changes consist of anything you’ve added or removed from the file.
-
Git allows you to save the same files at different points in time.
- This allows us to look at our code’s history from start to finish.
- If we make a mistake and it seems irreversible, just select a version of the file from back in time.
Example: If We Used Git With Word Documents
-
You are using Word and have a file named
mystory.docx.- You write for 5 hours and save each hour.
- Each time you save, this overwrites your copy.
-
With Git, it would instead create another version of the file in that point of time.
- Git hides these other versions so your folder doesn’t get messy, but you can call on the others if need be.
-
Git treats every version of code as a “snapshot” that you can look back/ revert to at anytime.
- Running a command called
git login the terminal displays every change you’ve saved:
- Running a command called
Git’s Tools
Repository
(short-form: “repo”)
A repository is a place where your project files are stored.
- Sort of like a main folder
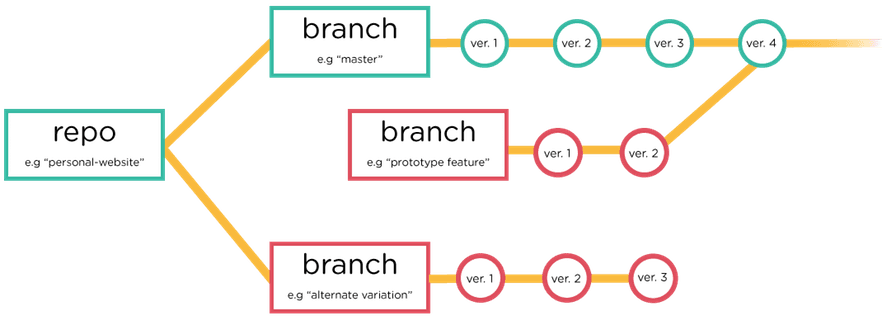
Branch
-
It’s like a folder inside of your repo.
- Where your files are stored.
-
You use branches for teams collaboration.
- Two people don’t work on the same file at the same time.
- Each person has their own version of the code.
- Their own copy of the files is called a fork or “forking a repo”.
- Must be named without spaces — replace a space with a dash (-).
Example: Why Branches?
Bob & John are working on one repo and the same files at the same time:
- Bob encounters a bug, it will take about an hour to fix.
-
John wants to continue working, but Bob’s bug is not allowing him to continue.
- In this situation, John would have to wait for Bob to fix the bug, then continue his own work.
-
An better alternative: Create two different versions of the same folder and its files of code (different branches).
- Work on their own work and bring them together when they are done.
Example: Branch Merging
- Bob is working on the
main.cssfile for the tool bar. - John is also working on the
main.cssfile, but for the header. -
We don’t want them overlapping each others code!
- Make changes to their own branches and then merge after to bring both of their changes together.
- Git has tools that allows you merge changes even if they occupy the same file and lines.
Master Branch
-
The main branch
- Git creates this branch automatically for you.
- This is only for completed versions of the code.
-
Where coders (you!) merge their final changes.
- Bob and John would merge their changes in the master branch.
Diagram of Master Branch Versus Another Branch
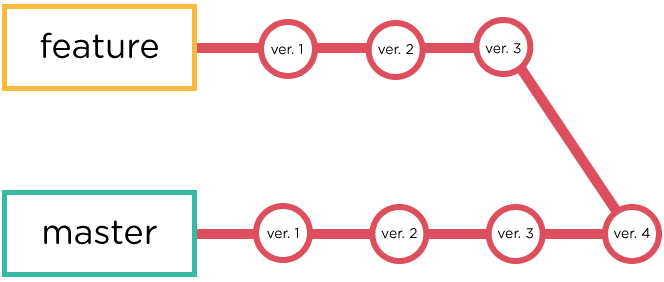
- Think of “master” as the tree trunk and “feature” as a literal branch.
What is GitHub?
GitHub (https://github.com/) is an online Git repository hosting service.
-
A friendly way to look at and manage repositories and branches with a GUI (graphical user interface).
- Basically prettier than just text on the terminal.
- Has its own tools that makes it easier and faster to collaborate with others (we’ll go into that later!).
Git and GitHub Pages w/ Provided Link
GitHub Pages is a free service by GitHub that allows you to host a website on their servers (https://pages.github.com/).
- The URL will have to be [username].github.io/[reponame]
Preparations
- You need to have at least one file named
index.html. - This is the conventional name of the main HTML file and GitHub Pages won’t host your files without one
- You provided a Git link when you made the workspace:
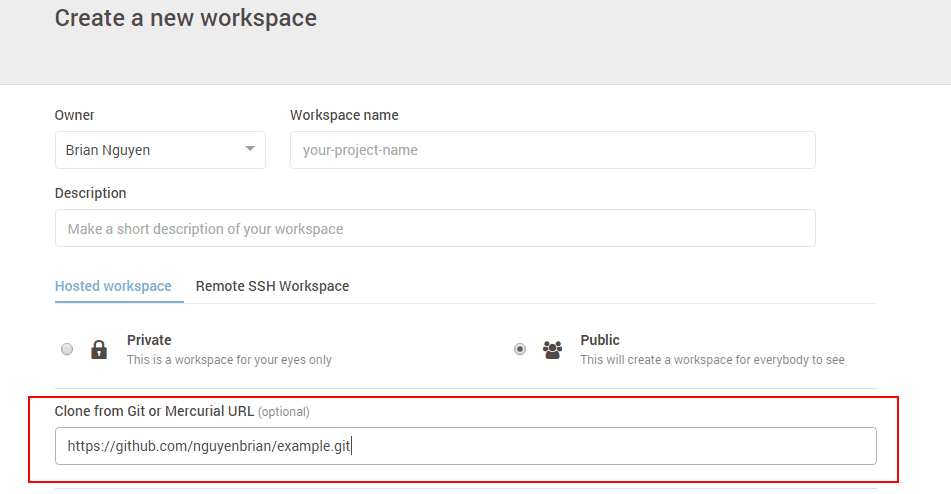
Nah, not familiar? Follow the steps in Git and GitHub Pages w/ provided link in heading below
Using Git and GitHub
-
Open your terminal
-
Depending on the workspace configuration you set, it might already be opened.
-
Hit the ”+” button in the bottom panel area OR on the top-bar click “Window” and “New Terminal”.
-
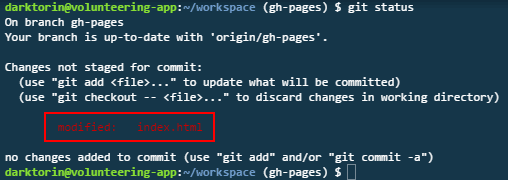
Type the command:
git add [file]ORgit add .. -
Adds a file to be tracked by git.
- E.g.
git add index.html.
- E.g.
-
My only file is
index.html.-
In the case you have more than one file, the period [.] means add every file in the workspace to the tracked files.
- E.g.
git add .
- E.g.
-
-
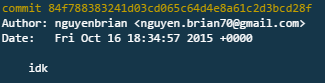
Type:
git commit -m "[commit message here]". -
Commits changes to be pushed to the branch.
-
-mstands for message and in quotations put a message that descriptions what you did.- If it is the first commit, simply put
git commit -m "first commit".
- If it is the first commit, simply put
-
-
Think of committing as packaging something into a package and putting the shipping label on it.
-
Don’t make bad commit messages: be concise, but clear about what you did.
-
Type:
git push. -
Part two of saving, “pushing”.
- Uploading to GitHub.
-
Think of pushing as actually shipping the container to the recipient, which in this case is the repo.
-
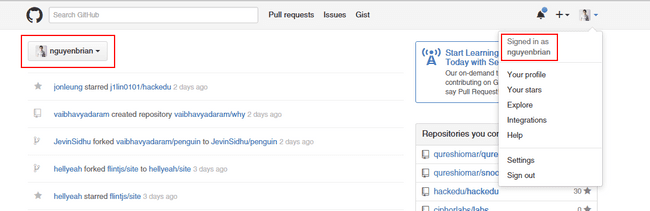
After hitting enter, you need to sign with your GitHub credentials.
- You can you find your username either on your profile or at these spots when you login to GitHub.

- The characters for the password not show up in the terminal for security reasons — just keep typing!
-
Type:
git branch [branch-name]. -
Creates a branch.
-
We must name this [branch name]
gh-pages.- GitHub will only host files in a branch named
gh-pages.
- GitHub will only host files in a branch named
-
Example command:
git branch gh-pages. -
Must be named without spaces — replace a space with a dash (-).
-
If you create a branch with the wrong name, delete it using:.
git branch -d [name of branch].
-
Type:
git push gh-pages. -
Push your branch,
gh-pages, online to GitHub. -
Afterwards your website should be up at
https://[yourusername].github.io/[reponame]. -
It might take about 30 seconds to fully get online.
-
Go online to
https://[username].github.io/[reponame]. -
Your website is now online! Enter the URL using your credentials and it should show up (wait 30 seconds or more if it doesn’t).
- E.g.
https://nguyenbrian.github.io/example2.
- E.g.
-
Note: The repo name is different from the branch name.
- The URL has is case sensitive - ensure the repo name is exactly the same one you put into your URL.
-
Example:
https://jevinsidhu.github.io/Personal-Website -
Celebrate!
Congrats, now you’re a Git (6) God!

Git and GitHub Pages w/o provided link
-
Open your terminal.
-
Depending on the workspace configuration you set, it might already be opened!
-
Hit the ”+” button in the bottom panel area OR on the top-bar click “Window” (8th from the right) and “New Terminal”.
-
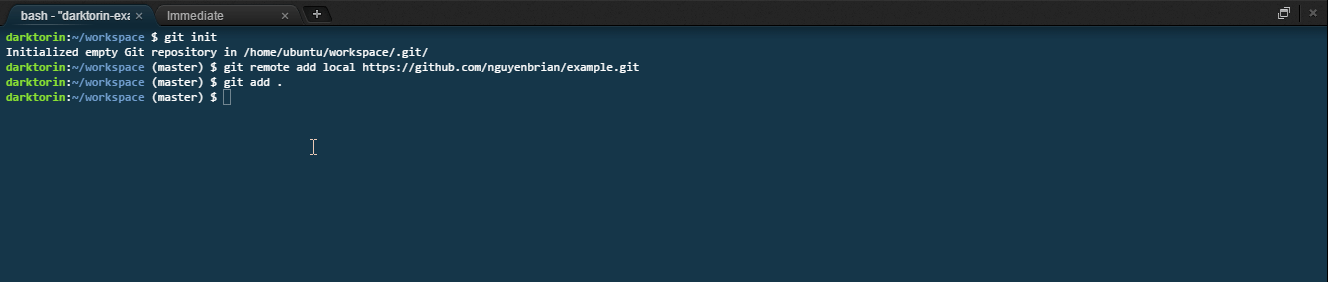
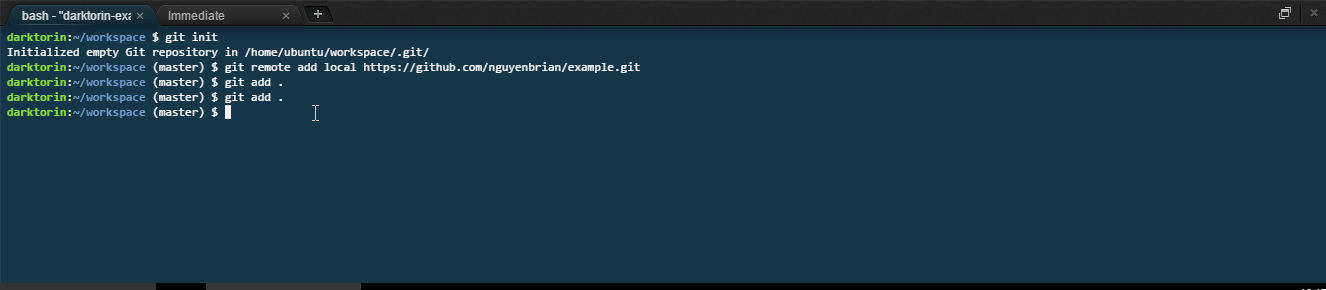
In the terminal, type:
git init. -
This creates a .git file inside of your project folder.
-
The .git file stores all the location data for your workspace.
-
This allows you to use git inside your folder.

-
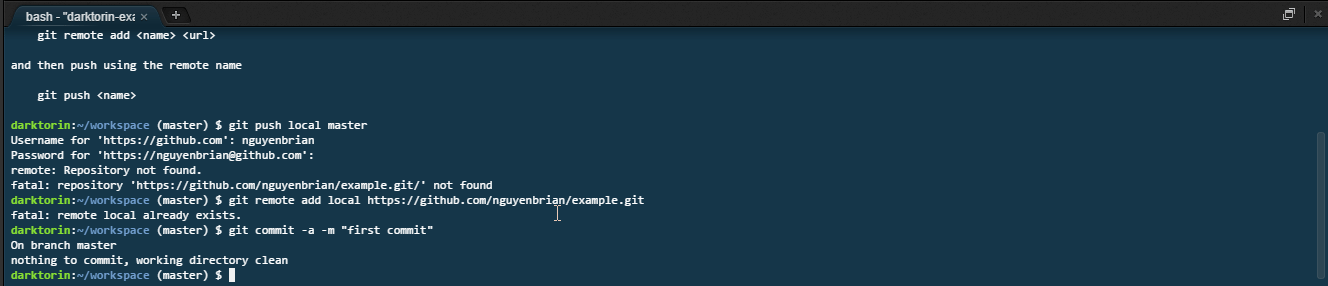
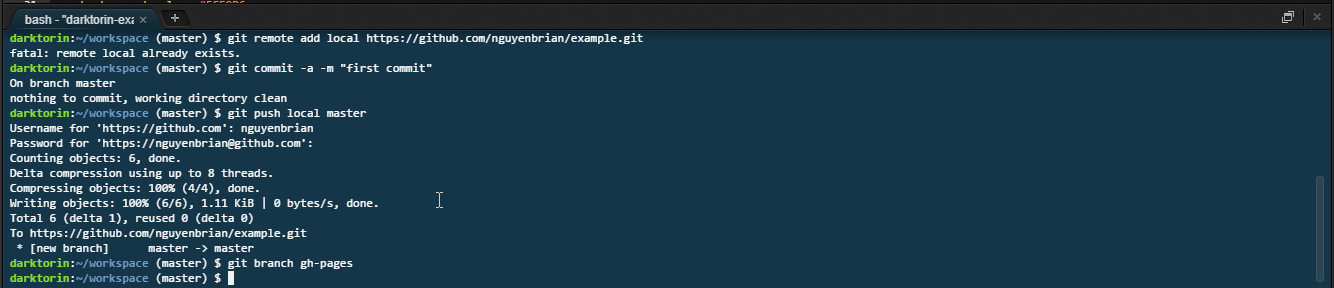
Type:
git remote add [remote-name] [link to repo]. -
Your changes need to connect your local folder to a remote one on GitHub.
- You need a connection between the two —> Create a remote.
-
On GitHub, click the green button that says “New Repository” near the middle-right area.
-
Name your repo (e.g hello-world) and give a short description.
- No spaces between your name —> replace a space with a dash (-).
- Short and to the point description.
-
-
Click the green button that says “Create repository”.
-
Copy the .git link it provides — that’s your
link to repo. -
It will be something similar looking to: https://github.com/nguyenbrian/example.git
-
Example: Remote is a TV Remote Controller.
- Hand is your local copy.
- TV is the remote repo on GitHub.
- The remote is the controller.
If you want to change the channel, you hit one channel up on the controller (remote) with your hand (local) and it changes the channel one upon your TV (remote repo).
-
Open your terminal on Cloud 9 and type the command:
git remote add [remote-name] [link to repo]
-
[remote-name] is where you name your remote.
- Don’t include the square brackets when you type, this is custom text you are inserting.
-
Name it something clear.
- i.e.
github
- i.e.
-
[link to repo] is where you paste the link from earlier.
- Again, don’t include the square brackets.
- Example command:
git remote add github https://github.com/nguyenbrian/example.git.
-
Type:
git add [filename.extension]ORgit add .. -
Adds a file to be tracked by git.
- E.g.
git add index.html.
- E.g.
-
My only file is
index.html.-
In the case you have more than one, the period [.] means add every file in the workspace to the tracked files.
- E.g.
git add ..
- E.g.
-
-
Type:
git commit -m "[commit message here]". -
Commits changes to be pushed to the branch.
-
-mstands for message and in quotations put a message that descriptions what you did.- If it is the first commit, simply put
git commit -m "first commit".
- If it is the first commit, simply put
-
-
Think of committing as packaging something into a package and putting the shipping label on it.
-
Don’t make bad commit messages: be concise, but clear about what you did.
-
Type:
git push. -
Part two of saving, “pushing”.
- Uploading to GitHub.
-
Think of pushing as actually shipping the container to the recipient, which in this case is the repo.
-
After hitting enter, you need to sign with your GitHub credentials.
- You can you find your username either on your profile or at these spots when you login to GitHub.
- The characters for the password not show up in the terminal for security reasons — just keep typing!
-
Type:
git branch [branch-name]. -
Creates a branch.
-
We must name this [branch name]
gh-pages.- GitHub will only host files in a branch named
gh-pages.
- GitHub will only host files in a branch named
-
Example command:
git branch gh-pages. -
Must be named without spaces — replace a space with a dash (-).
-
If you create a branch with the wrong name, delete it using:.
git branch -d [name of branch]
-
Type:
git push gh-pages. -
Push your branch,
gh-pages, online to GitHub. -
Afterwards your website should be up at
[yourusername].github.io/[reponame]. -
It might take about 30 seconds to fully get online.
-
Go online to
https://[username].github.io/[reponame]. -
Your website is now online! Enter the URL using your credentials and it should show up (wait 30 seconds or more if it doesn’t).
-
Note: The repo name is different from the branch name.
- The URL has is case sensitive — ensure the repo name is exactly the same one you put into your URL.
-
Celebrate!
You successfully pushed your site online!

More Commands
Clone
git clone [repo-url]
Cloning a workable copy of a repo onto your local workspace is when you download the repo onto a new computer.

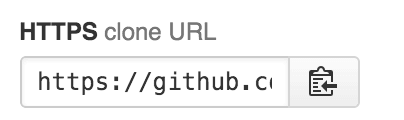
You’ll find the [repo-url] when you click a into a repo on GitHub and look
for this:
Merge
git merge [branch-to-merge-changes-from]
Merging combines the differences from another branch into the current branch you’re working in. For the time being, stay away from this and do a pull request using GitHub.
Extended GitHub Knowledge
Pull Requests
A pull request means to request changes to be “pulled” from one branch into another. Pull requests are commonly used to merge feature branches into master branches.
A good Git workflow:

GitHub Terminology
Fork
- Creates an identical repo under your name allowing you to edit its contents.
Similar to a clone, except instead of merging you would do a pull request to merge your changes to the master repo.

Pull Request
- Request to merge the contents of a branch or fork into a repo.
- Needs to be approved by the administrators of the repo you’re trying to merge into.
- Pulls the data from your repo into the main repo.
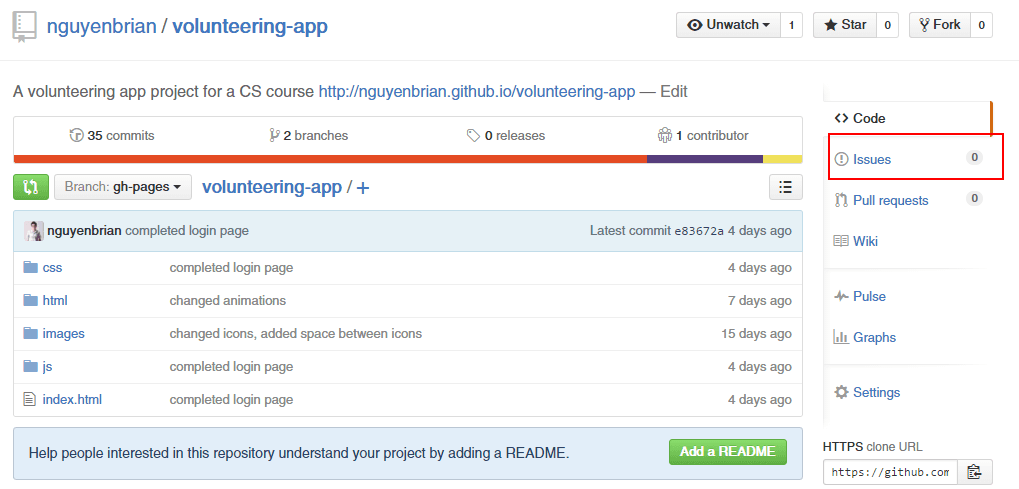
Issue
- User-submitted bug tracker.
- Allows contributors to discuss the bugs.
Contributor
Someone that contributes to the default branch through things such as commits, pull requests and submitting issues.
Follow Us on GitHub!
- Brian: https://github.com/nguyenbrian
- Jevin: https://github.com/JevinSidhu
- Udit: https://github.com/uditdesai
- Vaibhav: https://github.com/vaibhavyadaram
Explore!
There are tons of awesome projects people are creating on GitHub with some with thousands and thousands of contributors! Here are just a few:
- https://github.com/rails/rails - Ruby on Rails
- https://github.com/atom/atom - Atom: GitHub’s very own open-source code editor
How was this workshop?
(your feedback is anonymous + appreciated 💚)